Monday, August 29, 2011

California Coast ~ Two Views in Oil

 This summer I found a little bit of time to continue experimenting with oils.


In the weeks leading up to our family reunion, I completed two paintings as gifts 
for Carrie and Stephen and Christie and Jeff.


I wanted to send them home with a bit of California.
It's all a part of my devious plan to lure them to the West Coast once and for all.


This image reminds my of the coast near Monterey, 
a place we became familiar with while my parents lived in Aptos.


This more moody ocean view reminds me of Aptos itself, 
often blanketed in fog, the pine trees lining the cliffs overlooking the stormy sea.


How lovely if these paintings, hanging in my sisters' homes, 
reminded them that I wish they were here, and that I wish I were there.


Thursday, August 25, 2011

Summerland Inspiration {Bo-tan-ik}

While reunion-ing in Montecito, Scott and I stole away to Summerland for a bit 
to wander the antique shops (this reminded me of why I fake my antiques). 
A quick stroll around the sleepy shopping area brought us to Bo-tan-ik, 
an inspiring little garden boutique.


 I love the casual garden style they have on display.

 
~ lots of terra cotta pots, boxwood topiaries, wicker, and succulents ~

 
These woven willow obelisks were a fun discovery since I picked up two of them at my local Goodwill for about $4 each a few years ago. (You can see them here.) These ones were priced around $35 each.


I also spotted some golf ball kohuhu. 
I've been hunting it lately. (More on that later.) 
It looks a little like boxwood, but seems less woody. 
The stems are very dark and contrast with the rounded evergreen leaves.


The succulent arrangements were beautiful.


I love the variety of texture and shape while keeping the color palette simple. 
I guess I'm liking that indoors and out lately.


The garden vibe continued inside the shop with potted orchids, 
lots of natural wood, and bold fabrics.


Love that vanishing threshold ~ bringing the outdoors in and the indoors out ~ thing.
Love living in Southern California where this style is not only beautiful, but practical too.
And I always love finding a little unexpected inspiration.

Sunday, August 21, 2011

Don't Feed a Fool


This bit of advice is pretty familiar among Christians:

Foolishness is bound up in the heart of a child;
The rod of discipline will remove it far from him.
Proverbs 22:15 

You've probably considered it, especially the second half which admonishes parents to discipline their children lest they go astray. 

But it is a difficult thing to discipline our children. 
We feel bad about it. 
We wonder if we are doing something wrong when our children are unhappy with us.

I want to focus on the first half of this verse—“Foolishness is bound up in the heart of a child.” We can think of this in terms of our own foolishness, as children of God—sheep who are prone to wander, and we can think of it in terms of our children’s foolishness—the tendency of their hearts to run after wickedness and folly.

In the first instance, our acceptance of this truth inclines us toward humility in light of God’s wisdom and gratitude for his gracious discipline.

In the second instance, it can serve to reorient and strengthen our sometimes timid, second-guessing, insecurity as parents. 


Know this:  Children are inclined toward foolishness.

That puts the burden of wise guidance on us, the parents. That’s a heavy responsibility.

And it may make our children unhappy. 


(Although, can’t we all see that our children ultimately—in the long run—will be happier when their feelings are not in control?)

What a mistake to be led by what my child insists that he needs. 
To be a servant to his tears,
his whims,
his temper,
even his sense of fairness.


What a mistake to be led, even, by my memory of my own childhood experience and childish understanding of my parents’ choices.

I think we get off track when we begin to use our memory of our own parents’ mistakes or our interpretation of our own disappointments as a guide for the choices we make as parents. 

It can be a bit of a revelation to suddenly realize that much of the time my childish understanding of my parents’ behavior was limited, immature, and foolish


Now, of course, there may be serious, wrong-headed things that your parents (and mine) did—rightly to be avoided. 

But, I’m talking about the run-of-the-mill stuff, 
the things we feel conflicted about doing as a parent 
                                          because of the reaction it causes in our children: 
                                                                                   disappointment, anger, a sense of injustice. 

 
Don’t mistake me, I’m not recommending that we care nothing for our children’s feelings. 

But, really, is that our problem? 
(It's worth considering, it may be . . . )

Are we so callused and strict? Do we err on the side of being detached, harsh, and unconcerned? 


Or are we soft,
worried, 
coddling, 
uncertain,
and involved?
Are we encouraging dependence?

Remember how we can’t control our kids’ behavior? We also cannot control our kids’ feelings. And, just as a child’s behavior often evidences the foolishness of his heart—his feelings often reveal foolishness as well.

So let’s sit up straight, get our heads in the game, think it through, and bring all the godly wisdom we can muster to the task of guiding our children. It is likely that the very thing they need the most will (in the moment) bring an unhappy reaction. 


It is loving to give my child what he needs. 
It is selfish to cater to my own insecurities by bolstering, validating, and strengthening his foolishness—
                                                                                                                                     by feeding a fool.


Friday, August 19, 2011

Making Newer Things Older {Table Transformation}

As you probably know by now, one of my obsessions hobbies is tweaking our house, 
bit by bit, as cheaply as possible. For a while now I've been staring at our kitchen table, 
trying to imagine how to save it from its discolored, nicked-up, ignominy. 
I liked the shape and size, but the finish was just gunky. 
You can't really tell from this photo, but trust me people.


 I contemplated a long, slim, antique, well-worn farmhouse table


But then I remembered that our dining room is small and squarish and I really couldn't justify 
getting rid of our perfectly solid and perfectly proportioned (for our home) table. 
So I refinished it. 
It was a risky move. 
I knew it would take a lot of work, 
and I'd never refinished a major piece of furniture before. 
It was possible that I'd ruin the table altogether. 
But that gunk!
So I did it.

 I thought I'd chronicle the process here, just in case you are a complete novice like me,
trying to create an antique-looking bit of something or other out of a garage sale find. 
(Yes, we bought this table at our neighbors' garage sale years ago for an embarassingly low price.)

These are the first weapons I took to the task:
  • Citristrip spray, about 3 cans (I didn't end up using the paint-on kind.)
  • protective gloves
  • a plastic scraper
  • 80 grit sandpaper (and an electric sander)


First I sprayed on the stripper and waited for 30 minutes. Then things got really ooey-gooey. This stuff caused the black paint to wipe off, revealing a deep red stain under the paint. 
The clumps of junk coming off of this thing looked like coagulated blood and guts mixed with tar.


Yucky.
So, before I started sanding I used this Citristrip After Wash 
and wiped the whole thing down with many paper towels.


Much better.
Or is it?

This was the part of the process when I was the most skeptical. 
A hot pink table was not exactly what I had in mind.


So I started sanding and sanding and sanding. and sanding.
and. sand. ing.

I think my wrist is still recovering from the hours of vibration. 
But I got results. Instead of a hot pink table I had a light pink table. 
(At this point I was still thinking this whole thing was probably a pretty big, time-consuming mistake.)


As the day drew to a close I sent my kids out with pitchforks and table forks 
to attack that pale pink beauty. They took to the task with gusto.


I had decided to try to weather the table, give it some good dents and holes in an attempt to age it. 
I had noticed that the real antique farmhouse table at our reunion house 
was pretty battered and banged up, and I liked it.


I created the finish by following the steps recommended by the guy at Lowe's, 
and then I went off-grid. 
I became the rogue refinisher. 
I did not wear a mask.
Or a cape.

I rummaged around in the garage and found a bit of this and a bit of that and started layering and wiping and banging and hammering. And, well, here was the method to my madness:

 
  • Wipe on/wipe off wood conditioner (recommended by the Lowe's guy, but probably unnecessary, since I didn't really care how even the finish was ~ I was trying to make it look old, remember?)
  • Cabot wood stain in "English Leather" (At this point the color was too red for my liking and I went in to study the various shades of patina on our authentic antique wooden chest we use as a coffee table. I noticed that there were a lot of gold tones and even gray, almost dirty tones.)
  • Sand with 110 grit paper
  • Minwax wood stain in "Early American"
  • Sand again
  • Cabot wood stain in "Colonial Maple" (for the more golden tones)
  • More banging and hammering to add imperfections (detailed below)
  • At this point it was still too bright and new looking for my taste, so I rummaged around some more and found an old sample of dark gray paint. I watered it down a bit and wiped it on and then quickly wiped it off. This toned down the brightness of the stains and created a less even, more aged look. At least that's what I think it did. It also filled in all those imperfections with dark patina.

 Here's the result of all that freestyle layering ~


I tried to copy the kinds of dings and marks I saw on the real table

Here's how I did it:

~ an allen wrench hammered on its side to make the elbow mark ~


~ a large screw hammered on its side along the shaft, the head, 
and pointy-side down to make clusters of "worm holes"
(Seriously, these were all over the real one.) ~


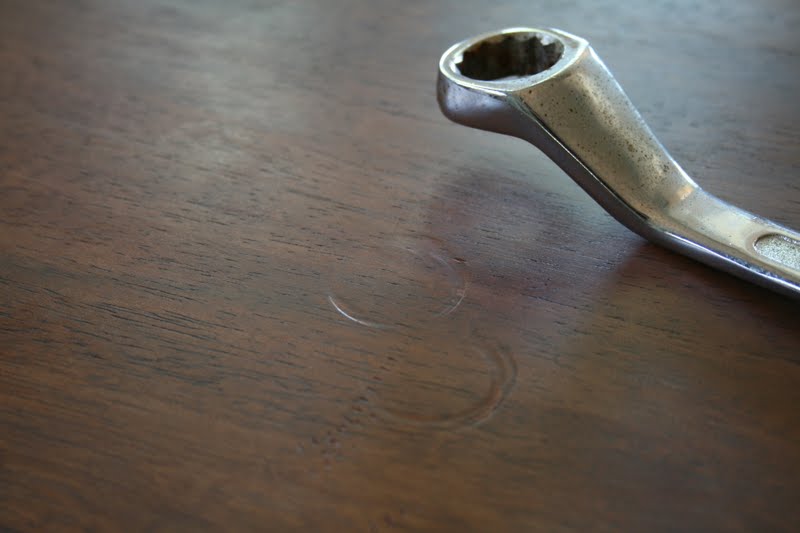
~ the box-ring end of a large wrench, hammered to make partial circles ~


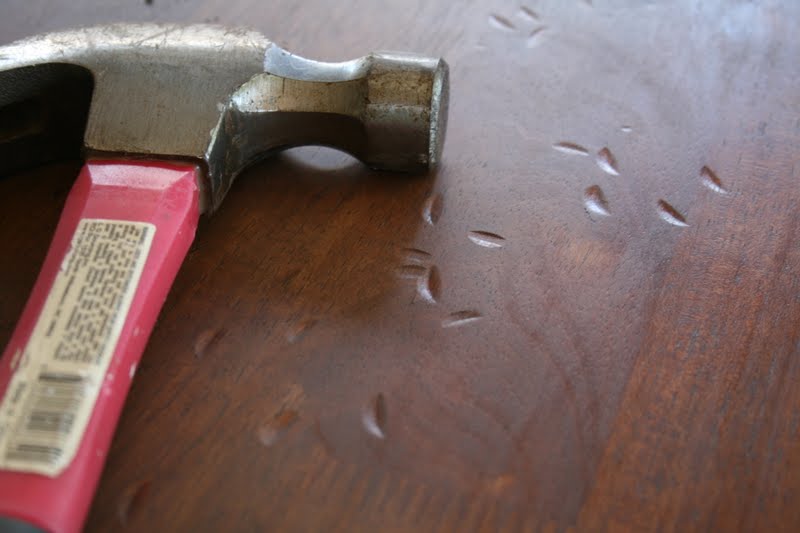
~ and the hammer itself ~


Then I brushed on a satin finish polyurethane, sanding lightly with 220 grit paper between coats.
I did four coats on the top of the table and two coats on the pedestal base and legs.


And here's the final result:


The stain is muted enough that I think it fits in with the room 
and with the other, older wood finishes.


It's battered up enough that I'm not worried about the kids messing it up.


It was definitely a risk, but I kind of liked the process.
Except for the stripping part.
That part was yucky.


What do you think?
Related Posts Plugin for WordPress, Blogger...